Windows Media Player: Display album art at full size
2013-01-08 10:00:00 新闻来源:cybertext.wordpress.com
I hate it when software wants to think for you and decides to display something the way IT wants to and not the way YOU want to. Windows Media Player (WMP) is a case in point — it displays album art at a reduced size and there’s no setting I could find to get it to display it at full size.
However, I was able to find a forum post (see the 06 August 2012 entry) that tells you how to change the Windows Registry to force WMP to display album art at full size. Unfortunately, that post left a few steps out, so here they are in full.
forum postNOTES:
NOTES:- Before starting this process, make sure you are comfortable with editing the Registry; back up the Registry first in case you make a mistake.
- These instructions are for Windows 7, but once you’re in the Registry of your Windows operating system they should work for earlier versions of WMP too; however, I haven’t tested these instructions on earlier Windows operating systems, so do this at your own risk.
- Update May 2019: See the comments below before starting this task. It’s possible that these steps from 2013 no longer work.
Edit the Registry to display WMP album art at full size
- Close Windows Media Player if it is open.
- In Windows 7, click the Start button and type Run in the search box.
- Select Run from the Programs list. This opens the Run dialog box.
- Type regedit in the Open field, then click OK.

- If asked about allowing access, click Yes. The Registry Editor window opens.
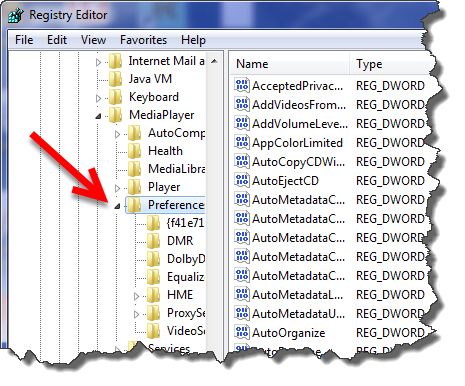
- In the left pane, expand these nodes: Computer > HKEY_CURRENT_USER > Software > Microsoft > Media Player > Preferences.
- Click on the Preferences node to display the settings in the right pane.

- In a blank area on the right pane, right-click and select New > DWORD (32-bit) Value.

- New Value #1 is added at the end of the long list of settings.

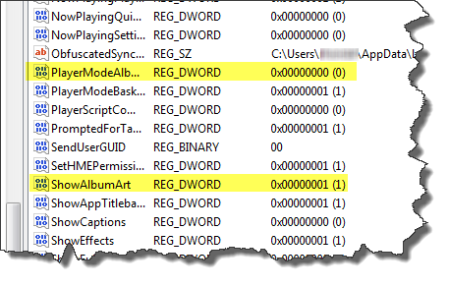
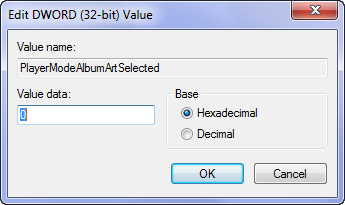
- Change this name to PlayerModeAlbumArtSelected
- Double-click to open PlayerModeAlbumArtSelected.
- Type 0 (zero) as the Value data then click OK.

- Still in the settings list, find the entry for ShowAlbumArt. Double-click it to open it and set its value to 1. Click OK.

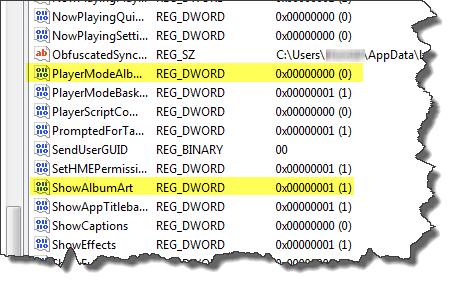
- You should now have two added/revised settings entries — one for PlayerModeAlbumArtSelected with a value set to 0 and one for ShowAlbumArt with its value set to 1 (see yellow highlighted lines in the screen shot below).
- Close the Registry Editor window.
- Re-open Windows Media Player — your album art should now show at full size.


[Links last checked January 2013]